Saturday, September 11, 2010

Update September


Oftentimes I paint things in the neighboring areas to help me judge the image's accuracy. I intend to chip away the echoes of the shirts and repaint them to completion on my next session


The next stage requires the artist apply thin washes of color over the undertones. Little by little the painting approaches a fully pigmented image and the thin washes allow the white of the plaster to shine through!


The paint goes on in thin washes of color. Traditionally artist would solve the values or tones in grays (grisaille) or with a single muted color such as grayish-green (verdaccio) or brown. After the undertones are finished the fresco painter takes a break to allow time for the paint to fuse to the plater. OFtentimes Diego Rivera would eat the lunch that his wife Frida Kahlo would prepare for him.


The image above shows the final layer of the intonaco made from one part fine marble dust and one part lime putty. After sitting for a short period of time the plaster will firm enough to be polished a bit with a smooth clean trowel. This helps keep the surface abosorbtion consistant. But as I've learned too much of a good thing (finely polished surfaces)can be a bad thing! :) Too smooth and the paint will not stay put and will pull up on second passes with the brush. Ack!

Thanks again to ILia from the Fresco School for that helpful tip!


This image (above) shows the first section of the Intanaco. It's two parts fine river sand combined with one part lime putty. It's floated to help maintain a level surface while at the same time providing a tooth for the next layer.


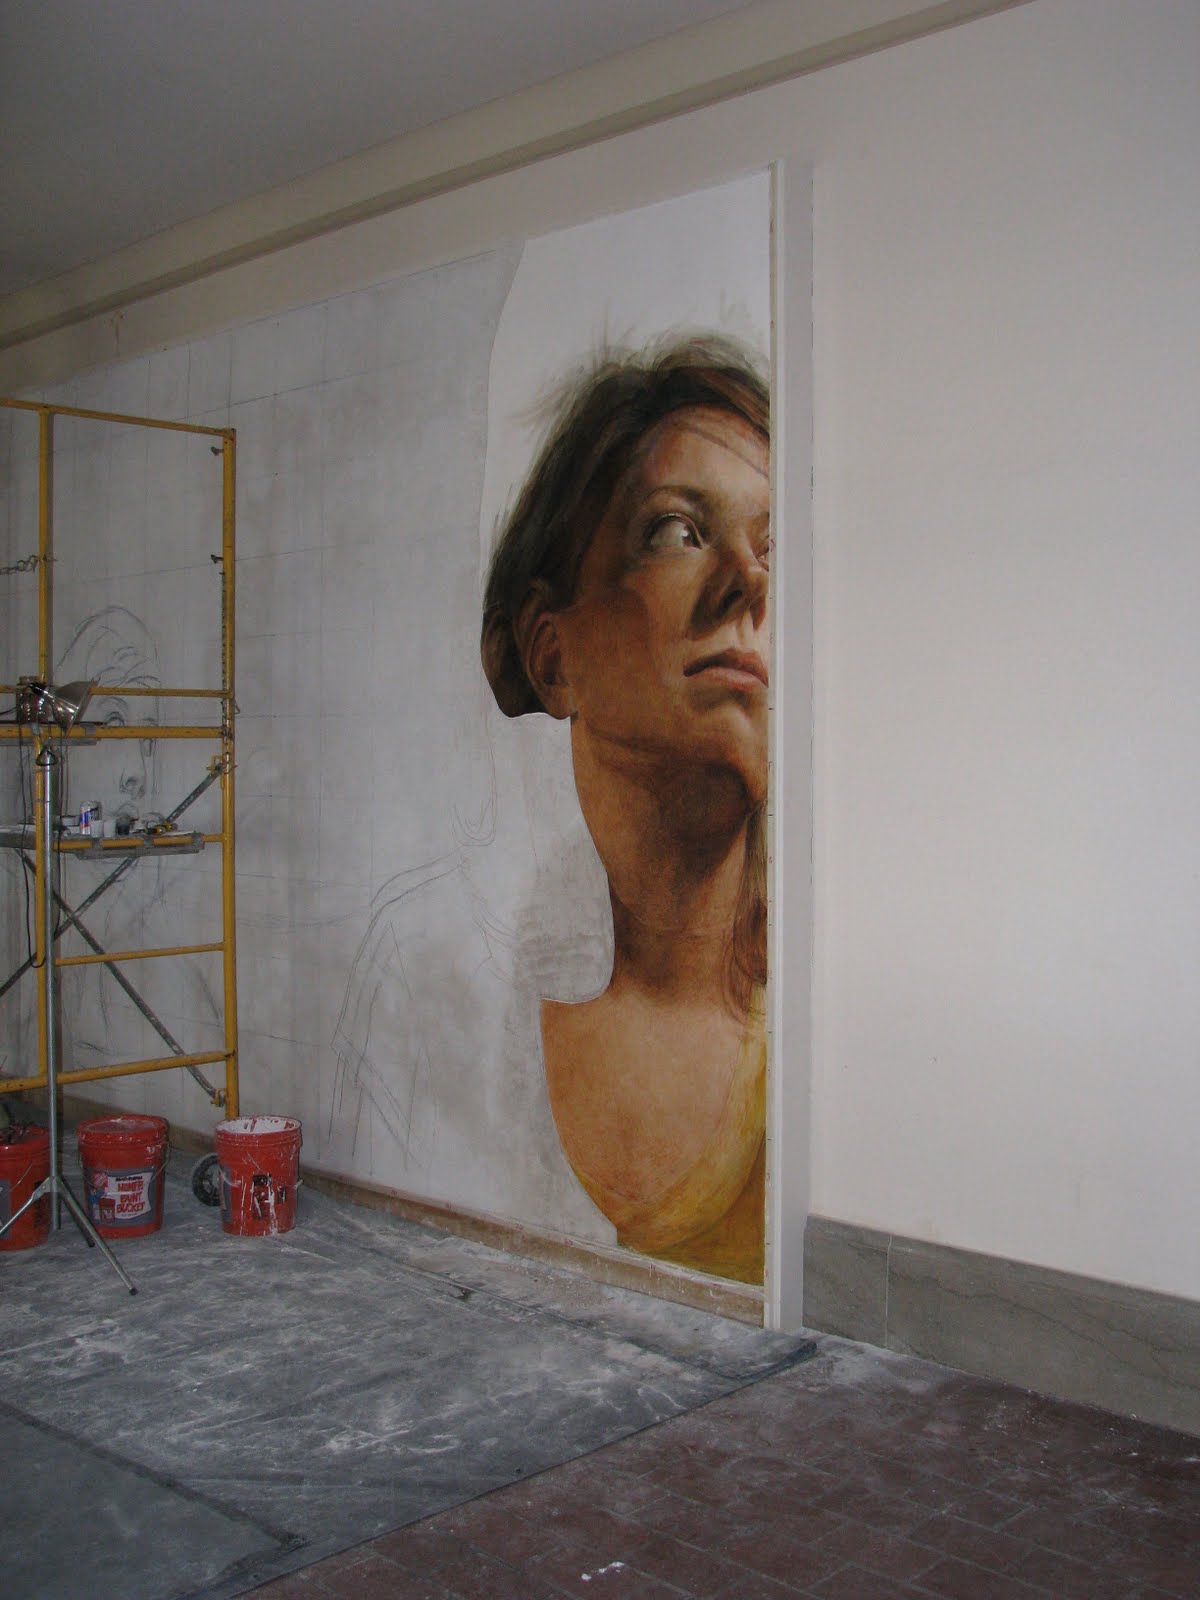
Here are a few images of the fresco these days. I've snapped a few in progress shots to show the progression of this particular giornata.

An educational opportunity came about as an art history class came through last week. They gave me advanced notice so I had my assistant Julie Schuck spread a small square of plaster, earlier in the day, for them to try their hand at painting on a buon fresco. I will chip that area off before painting the next section.

Thanks for looking

Saturday, August 14, 2010


.


Here are a couple in-progress shots. I have some of the section in between as well that will come later. Each session my confidence and skill grows. My control has grown significantly since changing my brushes to something more in line with traditional fresco brushes.

Mike

Friday, July 30, 2010

Updates coming soon!

sorry for the delayed updates. I'll try to get things up to date this weekend. Until then here are a few pics of the fresco's current state! The wall is 10.5 feet tall, making these faces around 5-6' each. I'd also like to throw a BIG THANKS out to ILia from the Fresco School for all of his advice. I couldn't have gotten this far without it!

Thanks for looking!


I plan to finish the far right figure first, from top to bottom before starting the middle and left zones. This is a little out of the ordinary as many fresco painters avoid finishing lower portions before upper portions typwriter style.


Last night's work included these ears (yup plural). When the rest of the figure in completed i hope it communicates a shifting image.

Monday, April 5, 2010

Scratch coat applied


The fresco crew, Pam, Nick, DePaul, Nate. Others not shown in this photo: , Theresa and Mike.


Over the weekend we applied the scratch coat to the wall. This gray layer gets its color from the gray Portland cement that is added for strength. To ensure the "key" gets a good grip the coat is applied to the wall without using finishing techniques such as screeding or floating. After this thick layers sits for a short time (30 min) it is "scratched" with a plasterer's comb. Care is taken to to scratch deep enough to provide tooth for the subsequent layers, but not so deep that it could sever and weaken the coat's strength. Due to the addition of the cement, repeated wetting of the wall is required for two days to prevent cracking.

The next layer commonly called the stabilizing layer or leveling layer will be meticulously worked to even out the lumpy scratch coat. A more comprehensive tutorial on the methods and materials used will be coming soon at http://buonfrescoinfo.blogspot.com/

Wednesday, March 24, 2010

Prepping the wall


For several reasons the fresco will be constructed on a floating wall, built out from an existing brick wall. The construction crew used 3/4" plywood that the students and I covered with water proof roofing paper, which is overlapped in the way that roof shingles are. This was followed by a layer of expanded metal lath that creates a suitable surface to hold the first layer of plaster. Plaster is pressed into the lath in such a way that some of the material pushes through the mesh, creating cement finger that hold the layer onto the wall.

Monday, March 1, 2010

The Location

(photo taken from WKU website http://www.wku.edu/pcal/uploads/images/Music/P1020304.JPG)


The fresco wall is housed in the newly renovated Van Meter Auditorium at Western Kentucky University, which was originally built in 1910 in the Greek Revival style. Architectural features include ornate Greek-style columns and pilasters as well as a beautiful art nouveau stain-glass sky light. A truly inspiring venue for the fresco project!

Sunday, February 28, 2010

Preparing the materials for an authentic "buon" fresco


Several months before the the mural wall was constructed my students and I began making lime putty from Hi-Calcium Hydrated Lime (type N) provided fresh from Cheney's Lime in Alabama. Letting the putty age for several months is beneficial and improves its quality in several ways. Our lime will sit for at least six months, however, the longer it ages the better. Many fresco painters insist on using lime putty that is no younger then two years old, and sometimes as much as ten!

Hydrated lime is very inexpensive ($8-9 per 50lb bag) and easily converted into the putty used by plasterers and fresco painters. Those interested in making their own putty, should carefully read the Manufacturer's Safety Data Sheet (MSDS) for Calcium Hydrate (aka powdered calcium hydroxide) and use the proper protective clothing, goggles and gloves.


While waiting for the renovation of Van Meter to be completed the students and I began formal discussions on the technique of buon fresco painting. In addition to learning about the basic materials, they were able to paint on practice tiles to get a feel for painting onto wet (damp really) plaster.

Wednesday, February 24, 2010

about the "buon" fresco technique

Essentials of the technique: (coming soon!)

A short step-by-step for portable fresco painting:


Portable frescoes can be completed on any rigid surface containing enough texture to hold plaster. In this case I used 3/4" plywood. The black roll is roofing paper used to protect the wood from the wet plaster.


Plaster will not stick to wooden or smooth surfaces so I have fastened expanded metal lath to give it a suitable "grip".


Application of the "scratch coat" mixed from one part lime putty, one part grey portland cement and 2.5 parts of coarse sand aggregate.


"Scratches" are added at the end when the plaster is somewhat firm. Similar to the expanded metal lath, this provides a proper tooth for the subsequent middle layer.


Wetting the dried scratch coat before applying the next layer is needed to keep the top layer's moisture from wicking out to the bottom layer. This prevents cracking and also makes spreading much easier.


This image shows the third and final coat of plaster commonly called the intonaco. It is made up of 3/4 part lime putty to one part fine marbled dust.

Note: The second coat was not photographed but contained a layer made from one part lime putty and two parts medium sized sand. Although only one layer of plaster is needed to paint a fresco (not uncommon) additional layers help increase the strength of the plaster, helping to reduce cracking. Three coats have proven to be stronger then two etc etc.

Before painting begins and as soon as the intonaco is firm enough to withstand impressions from a finger tip, the surface is polished with a clean damp trowel. This helps smooth the plaster if desired and the compression brings lime to the surface.


A finished buon fresco (3'x2') "Michelle Affresco"


A brief history of fresco painting: (coming soon!)

Tuesday, February 16, 2010

Image and Concept


Coming Soon! Image-making is currently underway. Pending approval of the concept, I hope the mural will incorporate a large hybrid illusion as a major component of the work.

Please check back in the next two weeks to learn more about the image that will be painted in the space as well as the decisions made during its creation.

Monday, February 15, 2010

Coming Soon!

Visit us for week-to-week updates!

Follow our progress as we construct and paint a 300 square foot buon fresco in Western Kentucky University's historic Van Meter Auditorium.

upcoming dates:

February 20th, 9am-?: Installation of waterproofing and expanded metal lath

February 25th-28th (Saturday starting at 9am): Application of a portion of the scratch coat.