Welcome to the WKU Fresco site! This blog documents the creation of a large-scale educational fresco on the campus of Western Kentucky University. The following informal posts show the development of the buon fresco mural that was created through the research efforts of Associate Professor Michael Nichols and his students.
Additional information and context can be found by clicking the pages located at top of the blog. These pages explain what buon fresco is, how the project started, and includes a list of folks who contributed work, resources, or vision to the project. You'll also find other bits of information and links throughout the posts.
Thanks for visiting!
Tuesday, May 1, 2012
Tuesday, July 19, 2011
Almost finished


A couple photos with a clean floor. I plan to sit on this for a while to decide whether or not I want to repaint the green area.

This last image gives an indication of the scale of the mural.
Sunday, July 10, 2011
Closing in :)
Here are some pics of the wall completely covered with fresco and/or white plaster. My lovely and talented wife Leslie is inspecting the work. :P


Some pics taken by Cheryl Beckley and the folks at WKYU-PBS. Thanks to the film team for all of their efforts (Cheryl, David, Amanda and Alan.)


Some pics taken by Cheryl Beckley and the folks at WKYU-PBS. Thanks to the film team for all of their efforts (Cheryl, David, Amanda and Alan.)


Tuesday, July 5, 2011
July updates


Hello everyone,
Here are some updates. I'm closing in on finishing the fresco! Last week I finished the large figure on the left and today I plastered from her to the figure on the far right and painted some echoes in the middle figure's hair. I forgot to get an image after the painting portion was completed so I'll post it again in a bit. Also note the white plaster at the top that is a bit darker is wet and will dry to nearly the same white as the far right right and left backgrounds. You shouldn't be able to detect the edge from a distance when it's finished (fingers crossed).
Thursday, May 26, 2011
May Update!

My most recent work. I plan to add a fifth figure on the right side of the mural and add echoes of the figures in the negative white spaces.
Saturday, January 22, 2011
More January updates!

I took advantage of the January break by working some long hours on the fresco. To this point, the tall figure is the result of three 21-23 hour days of painting, plus a fourth 20 hour day that was scraped off (painfully so). The hallway lights were off at the time I took these photos; the mural is being lit from the sky light in the atrium. When the lights are on the wall is lit fairly evenly, without shadows.


This last image was a fun shot that I took standing next to the mural. I simply looked up and shot the photo. I love how the vantage point skews the proportions and it gives you a good sense of the scale of the figure (gigantic). If you look carefully (click image to get a larger view) you can see faint lines that come from the transfer. Essentially I draw the image to scale on a large piece of paper. I hold it up to the wet plaster and transfer the drawing by incising the drawn line with my fingernail, which leaves a linear dent on the smooth white plaster. The dent fills in a tad darker when passed over with paint.

Monday, January 10, 2011
January update
hello everyone,

This is my palette. It includes cups of fresco-safe pigments ground in water. I mix colors (mostly) by layering transparent glazes from this basic set. I use paper towels to control the amount of water in my brush, which helps prevent dripping and allows me to respond to the plaster's changing thirst, with more or less wetness.
I'm still chipping away (literally in some cases) at the fresco. Here are some images showing where the image is today, which takes you all the way to my latest section, a 4.5 foot-tall face (a couple images down). In Sr. Wiley fashion, this face alone is the result of a working session that began at 8am on one day and ended at 5am the next (21 hours total, 12+ were actual painting).

A note: traditionally fresco paintings are completed sectionally in horizontal rows, starting at the top of the mural. This helps ensure that unexpected drips fall onto unfinished portions of the painting, rather then sections that were completed the day before. Despite the logic of this practice, and with great caution, I've chosen to work the figures first, irregardless of their vertical placement. I plan to finish the negative spaces between them, which include transparent echoes of figures towards the end of the fresco.


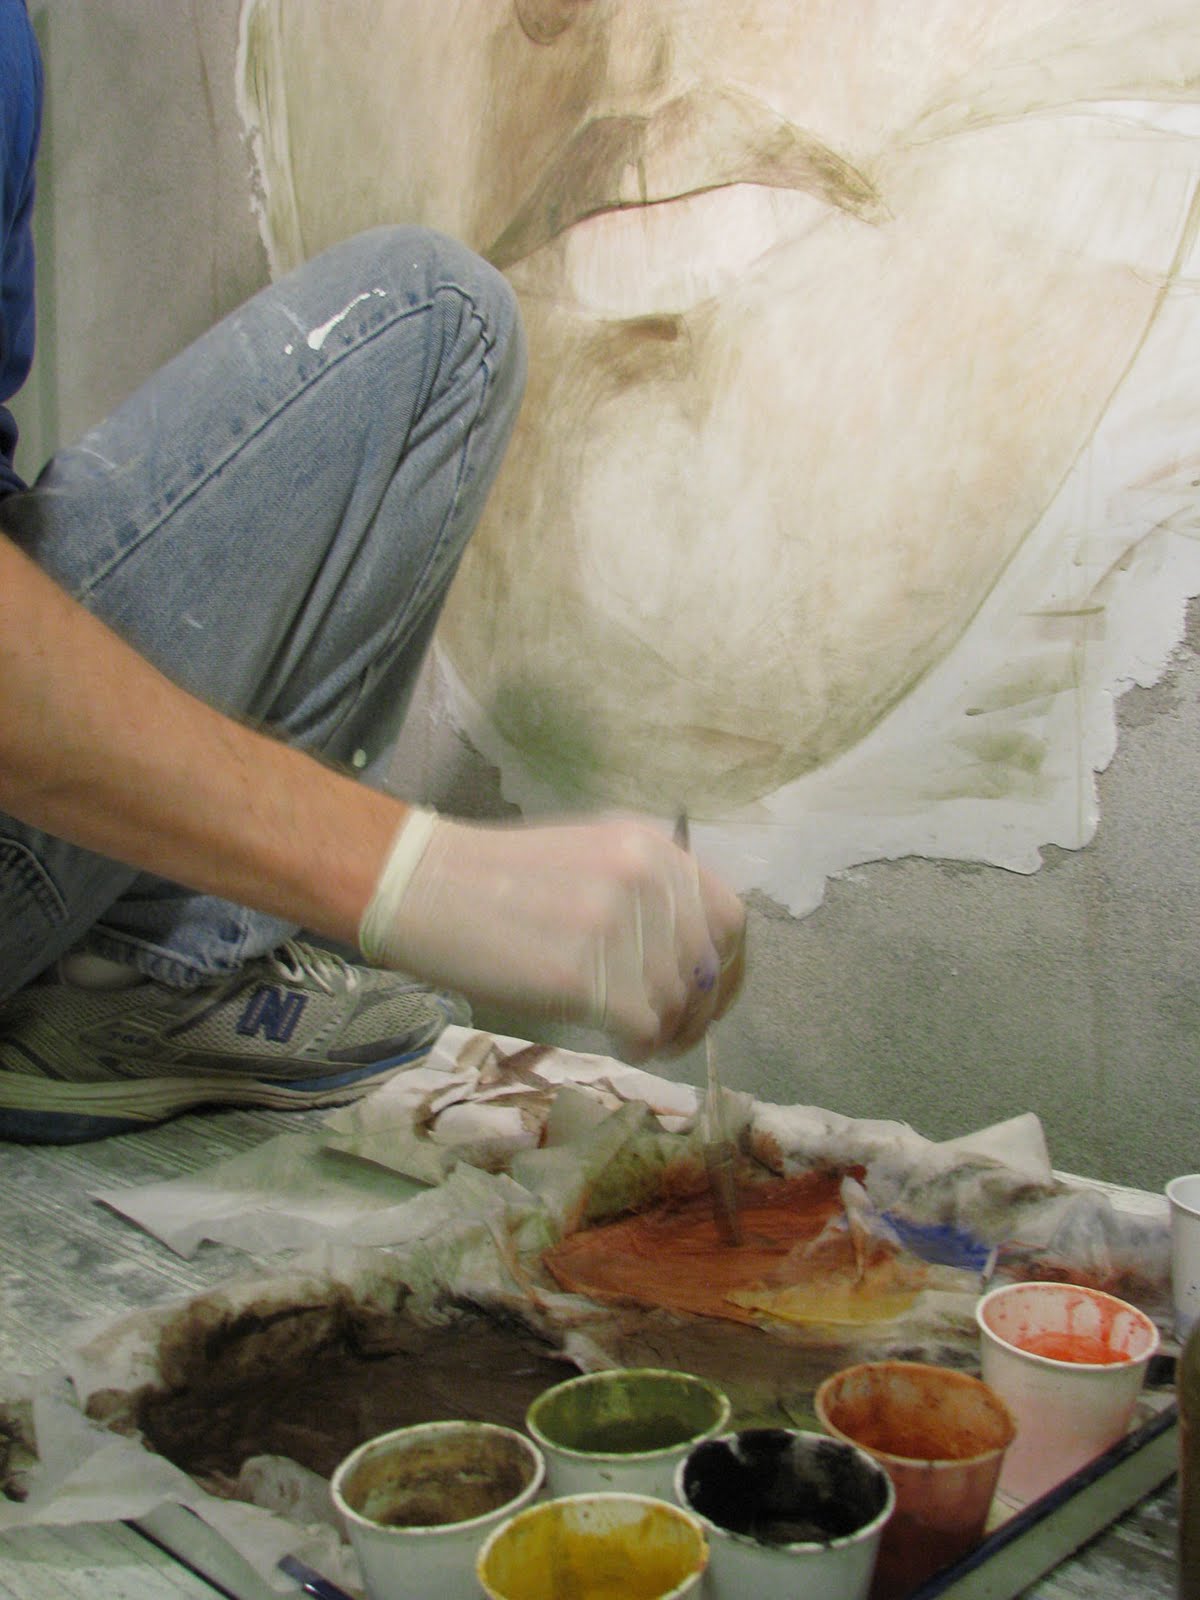
This is my palette. It includes cups of fresco-safe pigments ground in water. I mix colors (mostly) by layering transparent glazes from this basic set. I use paper towels to control the amount of water in my brush, which helps prevent dripping and allows me to respond to the plaster's changing thirst, with more or less wetness.
Traditionally painters squeeze out excess water and paint from brush with their finger tips. I've opted not to squeeze and instead use paper towels to control the water because some of the pigments are toxic.

The irregular white border around these figures will be carefully chipped away with a sharp chizel before working on sections that bump up to these figures.


Subscribe to:
Posts (Atom)